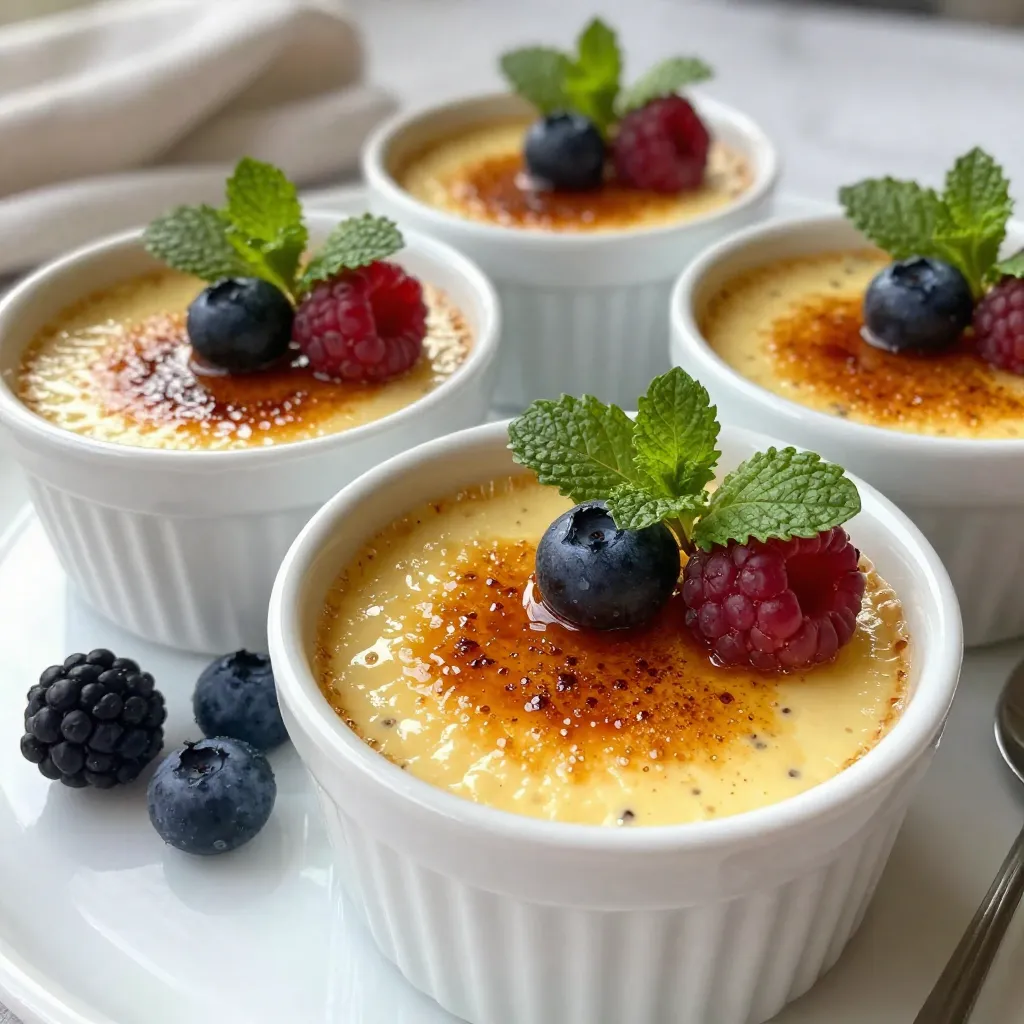
Get ready to indulge in a rich, creamy dessert that’s a breeze to make: Vanilla Bean Crème Brûlée. This delicate dish will impress your family and friends with its smooth texture and crisp caramel topping. In this guide, I’ll share my favorite tips, step-by-step instructions, and even variations to suit any taste. Let’s dive into the world of crème brûlée and turn your kitchen into a dessert paradise!
Why I Love This Recipe
- Decadent Flavor: This crème brûlée has a rich and creamy texture combined with the warm, aromatic notes of vanilla bean, making it a truly indulgent dessert.
- Simple Yet Elegant: With just a few high-quality ingredients, this recipe elevates a classic dessert into a sophisticated treat perfect for any occasion.
- Fun Caramelization: Using a kitchen torch to caramelize the sugar creates a satisfying crackling top that enhances the overall experience of enjoying this dessert.
- Perfect for Sharing: With four servings, this recipe is ideal for gatherings, allowing you to impress friends and family with a delightful homemade dessert.
Ingredients
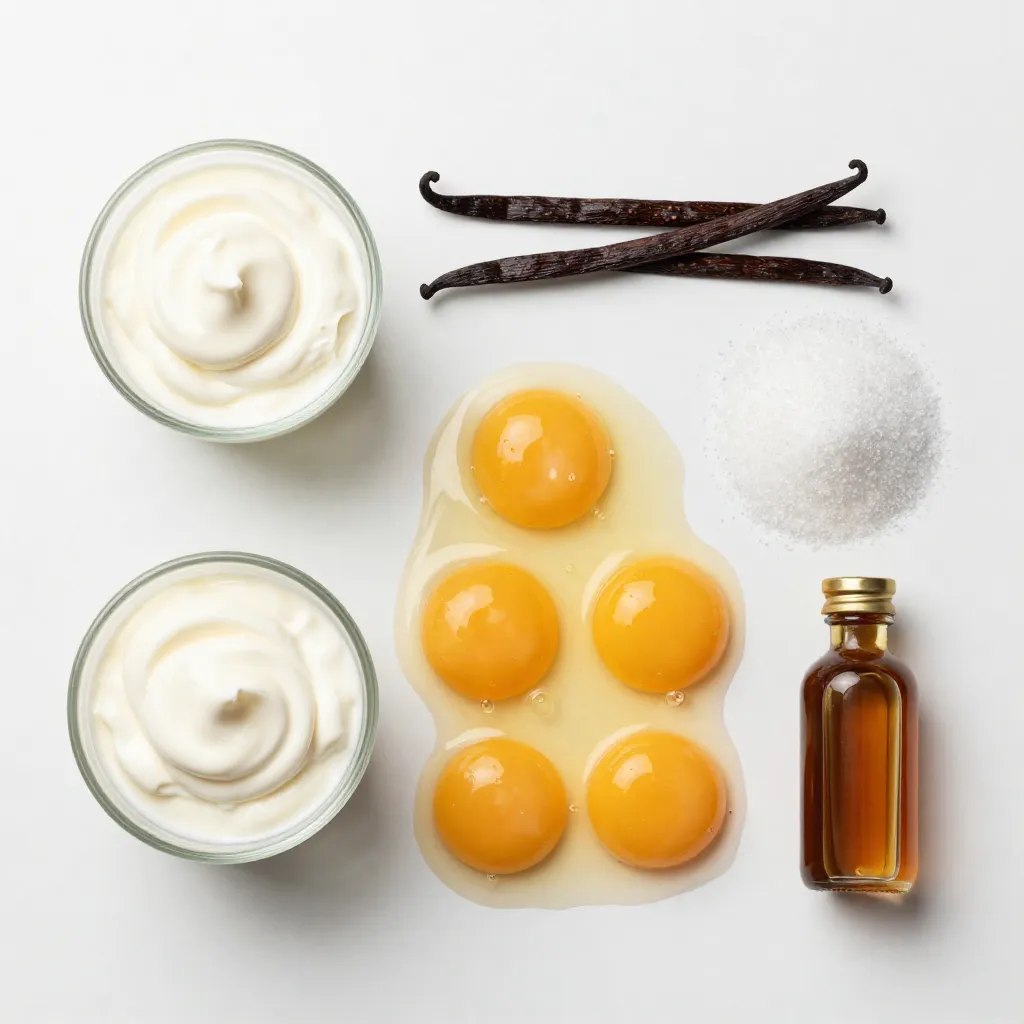
List of Ingredients for Vanilla Bean Crème Brûlée
– 2 cups heavy cream
– 1 vanilla bean (split and scraped)
– 4 large egg yolks
– 1/2 cup granulated sugar (plus extra for caramelizing)
– 1 teaspoon pure vanilla extract
– Pinch of salt
Importance of Each Ingredient
Each ingredient plays a key role in creating this dessert. The heavy cream gives a rich, smooth texture. The vanilla bean adds depth and a lovely aroma. Egg yolks provide creaminess and help the custard set. Granulated sugar sweetens the mixture, while extra sugar creates that crunchy topping. The pinch of salt enhances all these flavors, making each bite more balanced.
Tips for Sourcing Quality Vanilla Beans
When choosing vanilla beans, look for plump, shiny pods. They should feel soft and flexible. Avoid dry or brittle beans, as they lack flavor. Check for a strong, sweet aroma, which indicates freshness. You can find quality vanilla beans at specialty stores or online. Always store them in a cool, dark place to keep them fresh longer.
Step-by-Step Instructions
Preparation of the Vanilla Cream Mixture
Start by preheating your oven to 325°F (160°C). In a medium saucepan, mix 2 cups of heavy cream, the seeds from the split vanilla bean, and a pinch of salt. Place the saucepan over medium heat. Watch closely as it heats. When it simmers, remove it from the heat. Let it steep for about 15 minutes. This step lets the vanilla flavor shine through.
Mixing Egg Yolks and Sugar
In a mixing bowl, whisk together 4 large egg yolks and 1/2 cup of granulated sugar. Keep whisking until the mixture becomes pale and thick. This step adds air and smoothness. Next, slowly pour the warm cream into the egg mixture. Keep whisking to temper the yolks. This helps them cook gently without scrambling. Add 1 teaspoon of pure vanilla extract. Mix until fully combined and smooth.
Baking and Cooling Process
Strain the mixture through a fine-mesh sieve into a pitcher or bowl. This removes any lumps. Now, divide the mixture into four ramekins. Place these ramekins in a baking dish. Fill the dish with hot water until it reaches halfway up the sides of the ramekins. Bake in your preheated oven for 30-35 minutes. You want the edges to set and the center to jiggle slightly. After baking, carefully remove the ramekins from the water. Let them cool to room temperature. Then, refrigerate them for at least 2 hours or until fully chilled. This chilling helps the custard firm up nicely.
Tips & Tricks
Achieving the Perfect Caramelized Sugar Topping
To get a great caramelized sugar topping, use granulated sugar. Spread a thin layer over the chilled custard. Use a kitchen torch for even melting. Keep the torch moving to prevent burning. Watch closely as the sugar turns golden brown. If you don’t have a torch, broil it in the oven. Just stay near to avoid burning.
Common Mistakes to Avoid
Many people rush the cooling process. Always chill your crème brûlée fully before adding sugar. If the custard is too warm, the sugar can melt instead of caramelize. Another mistake is using too much sugar. A thin layer works best for even caramelization. Lastly, don’t skip straining the mixture. This step removes lumps, ensuring a smooth texture.
Ensuring Smooth and Creamy Custard
To make smooth custard, whisk egg yolks and sugar well. This helps create a light mixture. When adding the cream, pour slowly while whisking. This technique, called tempering, prevents curdling. Always strain the custard before baking. This extra step removes any curdled bits. Baking in a water bath keeps the temperature gentle, giving you that creamy texture you desire.
Pro Tips
- Use Fresh Ingredients: Always use the freshest heavy cream and vanilla beans for the best flavor. Fresh ingredients enhance the richness and aroma of your crème brûlée.
- Control the Torch: When caramelizing the sugar, keep the torch moving to avoid burning. A steady hand will help you achieve an even, golden crust.
- Perfect the Water Bath: Make sure the water reaches halfway up the sides of the ramekins to ensure even cooking. This technique prevents the custard from curdling and helps maintain a silky texture.
- Chill Thoroughly: Allow the custards to chill in the refrigerator for at least two hours before serving. This step is crucial for the flavors to meld and the texture to firm up properly.
Variations
Flavor Infusions (e.g., Chocolate, Coffee, Citrus)
You can have fun with flavors in crème brûlée. Try adding chocolate by mixing in melted dark chocolate. For coffee lovers, brew a strong espresso and blend it into the cream. Citrus zest, like lemon or orange, gives a fresh twist. Just remember to balance the flavor so it doesn’t overpower the vanilla.
Using Different Sweeteners (e.g., Agave, Honey)
You can switch out regular sugar for different sweeteners. Agave syrup works well if you want a lower-glycemic option. Honey adds a lovely floral note. Just adjust the amount, as liquid sweeteners are sweeter than granulated ones. Taste as you mix to find the perfect balance.
Vegan or Dairy-Free Alternatives
If you want a vegan version, swap heavy cream for coconut milk or almond milk. Use cornstarch to help it set instead of egg yolks. You can still infuse it with vanilla for that rich flavor. Remember to watch the cooking time, as vegan options may bake faster.
Storage Info
How to Properly Store Crème Brûlée
You should store crème brûlée in the fridge. Cover each ramekin with plastic wrap. This keeps the custard fresh and prevents it from absorbing other flavors. Always wait until the caramelized sugar is ready to serve. Storing it with the sugar on top can make it soggy.
Best Practices for Reheating
If you need to reheat crème brûlée, do so gently. Place the ramekin in a warm water bath for a few minutes. This method helps keep the custard smooth. Avoid using a microwave, as it can heat unevenly and ruin the texture.
Shelf Life and Freezing Tips
Crème brûlée lasts about four days in the fridge. If you want to freeze it, do so without the sugar topping. Wrap the ramekins well in plastic wrap and foil. You can freeze them for up to three months. To serve, thaw in the fridge overnight, then caramelize the sugar just before enjoying.
FAQs
Can I make Crème Brûlée ahead of time?
Yes, you can make crème brûlée ahead of time. After baking, let it cool and chill it in the fridge. It stays fresh for up to three days. Just caramelize the sugar right before serving for the best texture.
What are the best tools for caramelizing sugar?
The best tool for caramelizing sugar is a kitchen torch. It gives you control and helps you create that perfect golden crust. If you don’t have a torch, you can use the broiler in your oven. Just watch it closely to avoid burning.
Why is my crème brûlée not setting properly?
Your crème brûlée may not set if the oven temperature is too high. Make sure to bake at 325°F (160°C). Also, avoid overmixing the egg yolks with the cream mixture. If it’s still too runny, it may need more time in the oven.
What’s the difference between crème brûlée and flan?
Crème brûlée has a rich, creamy texture and is topped with caramelized sugar. Flan is smoother and often made with whole eggs and sweetened condensed milk. Flan also has a soft caramel sauce on top, making the two desserts quite different.
Can I use vanilla extract instead of a vanilla bean?
You can use vanilla extract, but it won’t have the same depth of flavor. Use about one teaspoon of extract for each vanilla bean. Remember, a vanilla bean gives that lovely speckled look and richer taste that makes crème brûlée special.
Vanilla bean crème brûlée is a delightful dessert you can master. We covered essential ingredients, step-by-step instructions, and helpful tips. Each part plays a key role in your success. Remember to choose high-quality vanilla beans and avoid common mistakes. You can even try new flavors and sweeteners to make it your own. Proper storage will keep your dessert fresh. Now, you have the tools and knowledge to create a perfect crème brûlée. Enjoy the process and share your delicious results with other